Even if you want to go to a driving school to get a motorcycle license, what should you do? Can I really do it even if I don't know anything about motorcycles? It's full of anxiety, isn't it?
Here, we will explain the content of the lessons that will be conducted at the beginning, to help answer any questions you may have about what to do at the driving school, and also provide information on basic knowledge that will be useful even after the lessons actually begin.
If you read it, you will understand the basics and will be able to concentrate on improving your driving skills, so please read it before attending a driving school.

1. First of all, raise it, maneuver it, and remove the center stand.
The first thing you do after entering the school is to ``raise'' a fallen bike, ``handle it'' by pushing it around with the engine off, and ``park the bike on the center stand.''
It looks easy when you write it down, but it's quite difficult if you don't know the tricks.
*Actually, you will be taught how to wear a helmet and how to tighten the chin strap, but these are not difficult so I will omit them.
*Two-wheeled lessons require a lot of physical effort, so you may be asked to do some warm-up exercises before the lesson begins.
For those who are weak, the beginning is the most difficult! ? Lifting up a fallen bike
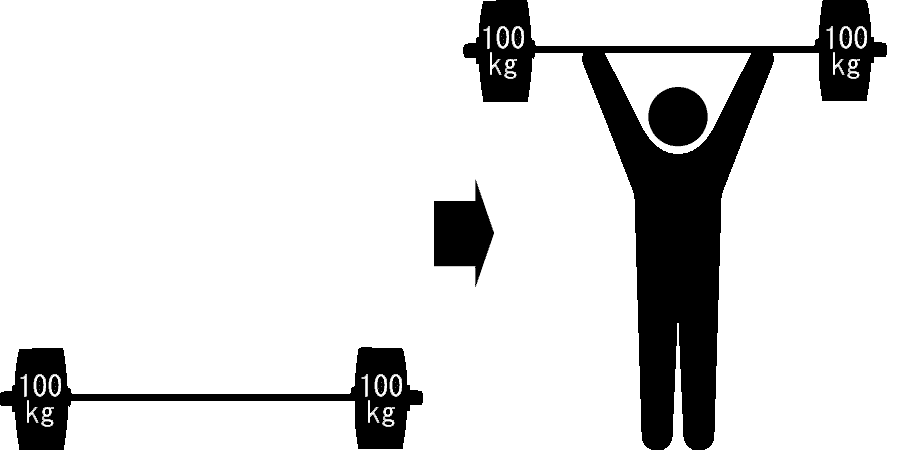
In the case of Regular Motorcycle (400cc), the weight of the vehicle is approximately 200kg for a manual transmission and approximately 230kg for an automatic transmission, depending on the training vehicle used. Can you imagine how difficult it would be to consider it as a block of iron that weighs that much?
Of course, it is impossible to lift something with just the strength of your arms, and even if you use the strength of your whole body, it is impossible to ``lift'' it unless you are very strong. However, even those who are weak can do it if they get the hang of it.
It doesn't lift things up, it just raises things that have fallen down.
Even if it's impossible to do this
Isn't that pretty much the case?
Of course, you need a certain amount of muscle strength, but if you don't have this strength, you won't be able to do anything if you fall, so let's do our best!
There are basically three methods of triggering.
How to raise it by holding the handle and hanger (metal frame above the rear wheel)
How to wake up by holding the left and right handles with both hands,
How to wake up by holding only the handle in the direction of the fall with both hands
There are three.
Regardless of the method, the important thing in common is to ``squat down firmly and insert your hips.'' Instead of trying to wake yourself up using just your arms, squat down and place your lower back tightly between the tank and the seat, and use your whole body (especially your leg muscles) to wake yourself up. It's more like pushing yourself up using your hips rather than raising yourself up.
Some strong men may be able to wake up by squatting down and using only their upper body strength, but this can cause back pain, so be sure to squat down firmly and use your legs to wake up.
Also, if you are trying to raise a vehicle that has fallen onto the right side, take out the side stand in advance so that you can lean it on the stand after you raise it up.
If you get the hang of it, you won't fall down.
Start maneuvering by holding the handlebars with both hands and holding the bike close to your body so that the weight is supported by your hips.
When pushing, it will be easier to move if you imagine pushing with your hips instead of relying only on your arm strength. When backing up, hold the handle with your left hand and the hanger with your right hand, making sure to check the safety behind you as you move.
If the bike leans to the right (the opposite direction of your body), you won't be able to support it with your hips, so you won't be able to withstand the weight of the bike, and even the slightest tilt will cause you to fall.
Be especially careful when turning left, where the vehicle tends to tilt to the right.
Tips for hanging on center stand
The difficulty of using a center stand varies considerably depending on whether you can get the hang of it or not.
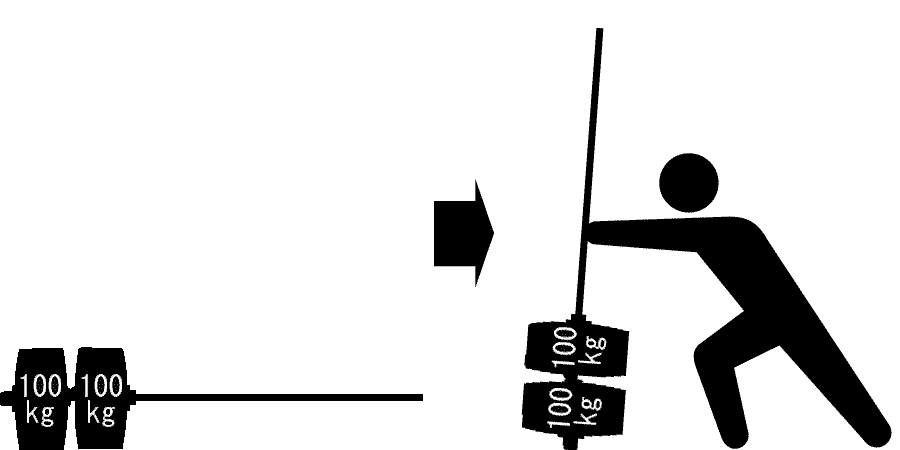
When the center stand is on, the front and rear wheels are completely off the ground, and nothing is in contact with the ground except for the stand, so you tend to think of it as ``lifting up the car''.
However, as mentioned above, the vehicle weighs about 200 kg, so it requires tremendous physical strength to lift the vehicle and place it on the center stand.
Textbooks often say "put your whole weight on your foot and use the principle of leverage," but I personally say "kick the center stand with the intention of driving it into the ground." It feels better.
The idea is that the strength of your arms is not used to lift you up, but to support your body so that it doesn't lift up when you kick.
How to remove the center stand without using too much force and without knocking it over?
To remove the center stand, hold the handle with both hands, pull it toward you once to get some rebound, then push it forward to remove it. Once the stand comes off, quickly apply the front brake and support it with your waist.
At this time, be careful not to tilt the bike to the opposite side of your body, as you may not be able to support it enough and fall.
If you turn the steering wheel slightly to the right in advance, it will naturally lean to the left. If you end up flipping the stand to the opposite side of your body as soon as you remove it, the handle is likely bent to the left, so be careful.
So far, I have not even started the engine or even sat on the bike.
At the driving school, you will then actually straddle the train and learn how to ride and posture.
- It is no good to remove the stand after riding. Take it off and ride.
- Make sure your surroundings are safe before riding quickly.
- It is no good to touch your right foot to the ground when riding. Put it on the steps of the bike.
There are various rules for how to ride a vehicle, but I will omit them because they are not complicated and I don't think there will be any problems if you take the lessons at a driving school with the vehicle in front of you.
2. Learn the names, roles, usage, and basic operations of each part.
Before starting the engine, you will of course be taught how to start the engine. You will also learn the names, roles, and uses of each part.
The equipment involved in starting the engine will be explained later, so the order of teaching may be different from the order in which it will be taught in the actual lesson, but we will introduce the names and roles of each part.
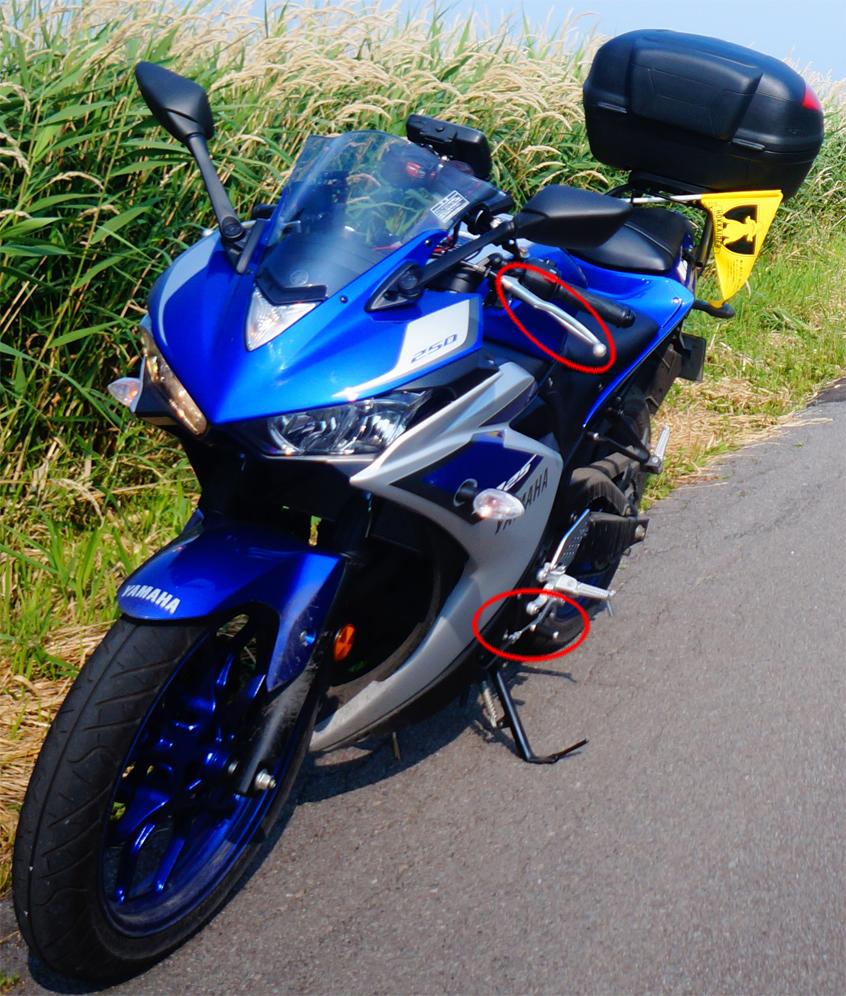
Acceleration/deceleration operation
First, I will explain the accelerator, which increases engine speed and accelerates, and the brake, which decelerates.
First of all, Axel, I don't have to explain it, but everyone probably knows where it is. Yes, it's the right hand handle grip.
When you turn this accelerator grip toward you, the throttle opens and the engine speed increases.
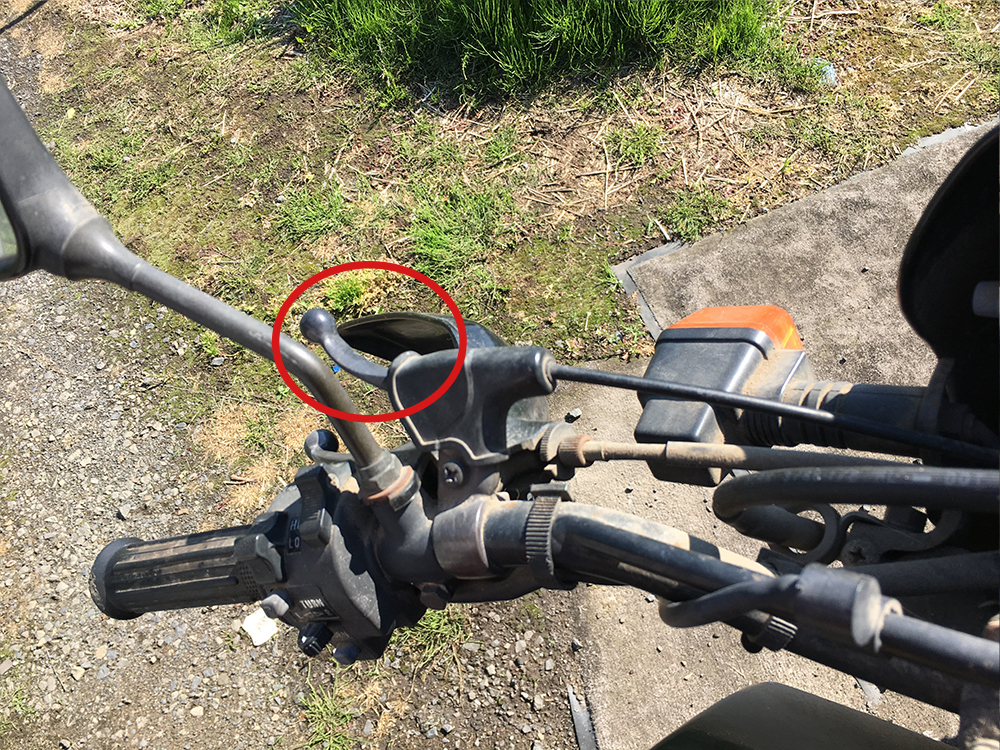
So, do you know where the brakes are? The front wheel brake is operated by the brake lever located behind the accelerator grip, and the rear wheel brake is operated by the pedal in front of the right foot step (the part where you place your foot) rather than the lever in your left hand like on a bicycle.
All the things used for acceleration and deceleration operations are gathered on the right side.
Gear shift operation
Next is the gear shifting operation. The clutch, which connects and disconnects engine power to the tires, is operated by a lever on the left hand, and gears are operated by a shift pedal located in front of the left footstep.
What exactly is a clutch? Some people may think so, but it would be too long to explain in text, so I will omit it here.
You can't run a bike without at least these four parts, both in the rabbit and the corner, and they're actually the parts you use the most. Therefore, it is placed in the part that is easiest to operate.
The accelerator and brake are on the right, and the clutch and shift are on the left, so although the hands and feet are mixed, the left and right placement is the same as in a car. Isn't it easier to imagine for those who got their regular car license with MT?
Various meters
There are many meters on motorcycles, and the installation location and which meter is installed depends on the vehicle model.
However, there are two things that are always installed in every car model.
- "Speedometer" that shows the current driving speed
- The odometer displays the total distance traveled since delivery.
is.
Besides these two
- Tachometer (rpm meter) that displays engine speed
- A trip meter (distance meter) that can be reset and is used to measure mileage.
- "Fuel gauge" that displays the remaining amount of fuel
- "Water temperature gauge (or oil temperature gauge)" that displays the temperature of cooling water and oil
etc. may be included depending on the vehicle model.
By the way, the CB400SF, which is often used as a training car, has everything except the water temperature system.
Various switches
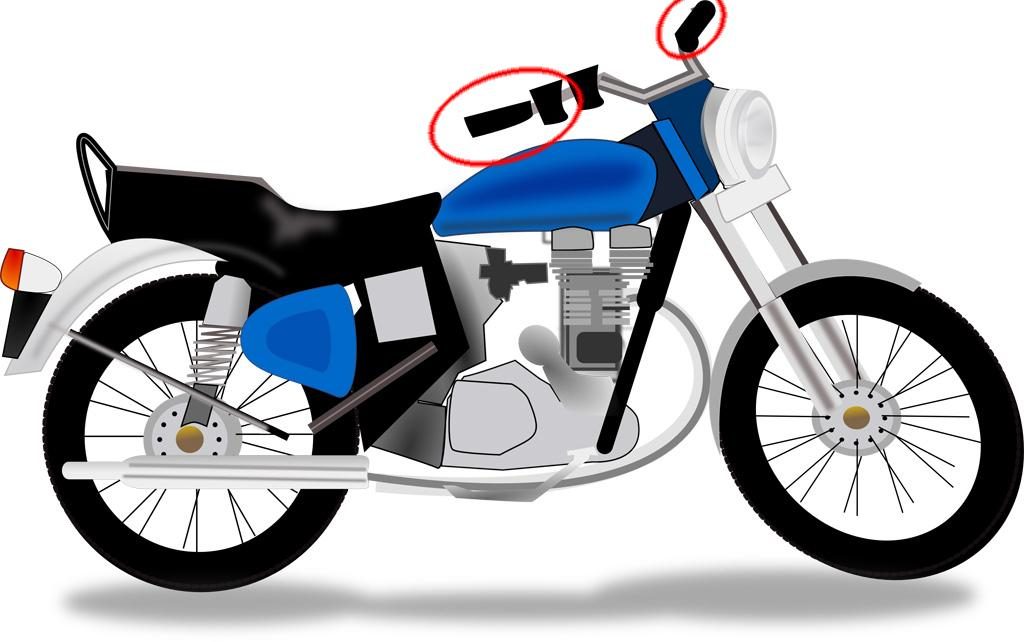
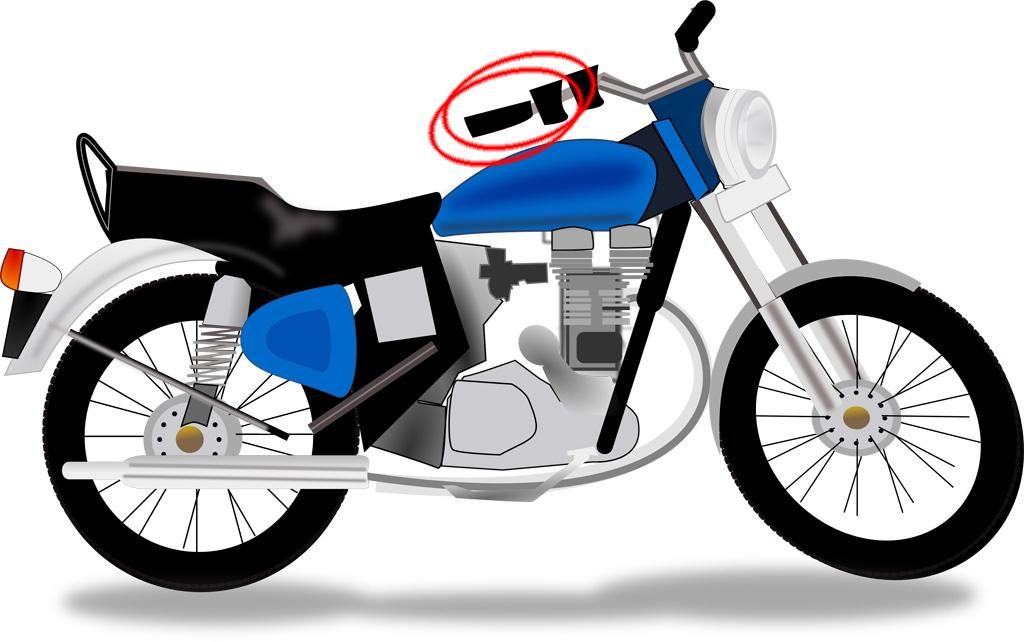
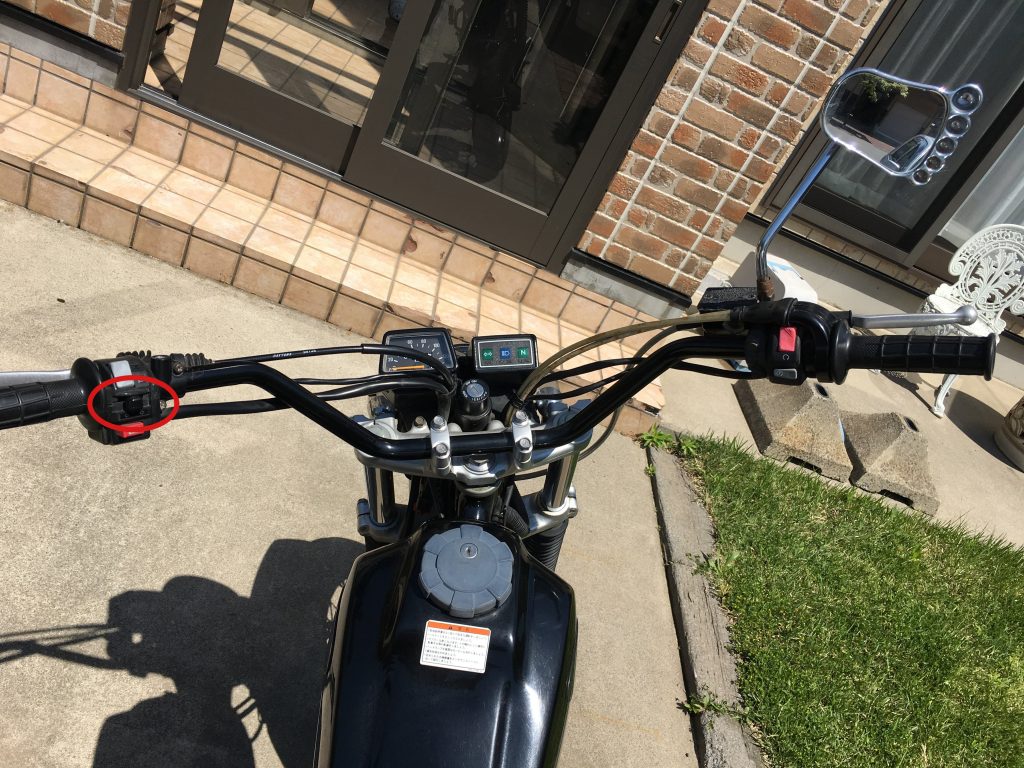 Next are the various switches. First of all, the turn signal switch is in this position.
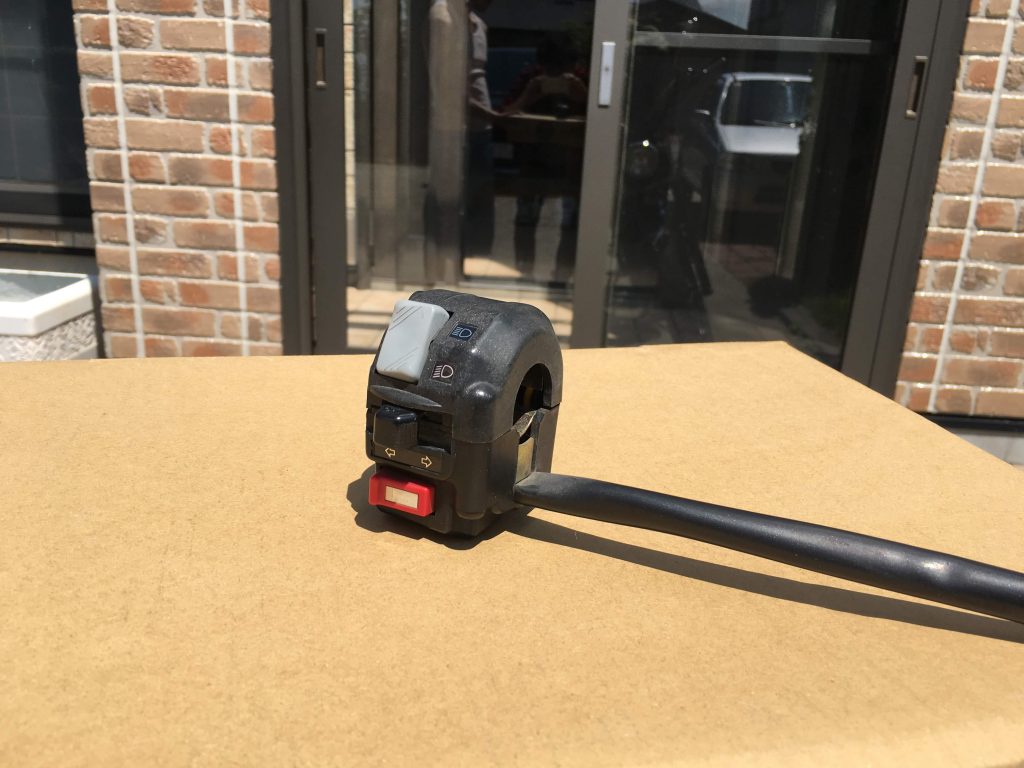
It looks like this when expanded. If you move it to the left, the left turn signal will flash, and if you move it to the right, the right turn signal will flash. To erase it, press it inward.
Below the turn signal is the horn switch, and above is the switch for switching the headlights between low and high.
Depending on the car model, there may be a hazard lamp switch or a choke lever (described later) next to the light switch, and there may also be a passing switch on the back side that can be operated with your index finger. In other words, there are up to six switches in this part alone.
The right side of the handle is a switch that is mainly used for starting the engine, so we will explain it along with the starting operation.
3. Start the engine and drive
Starting operation
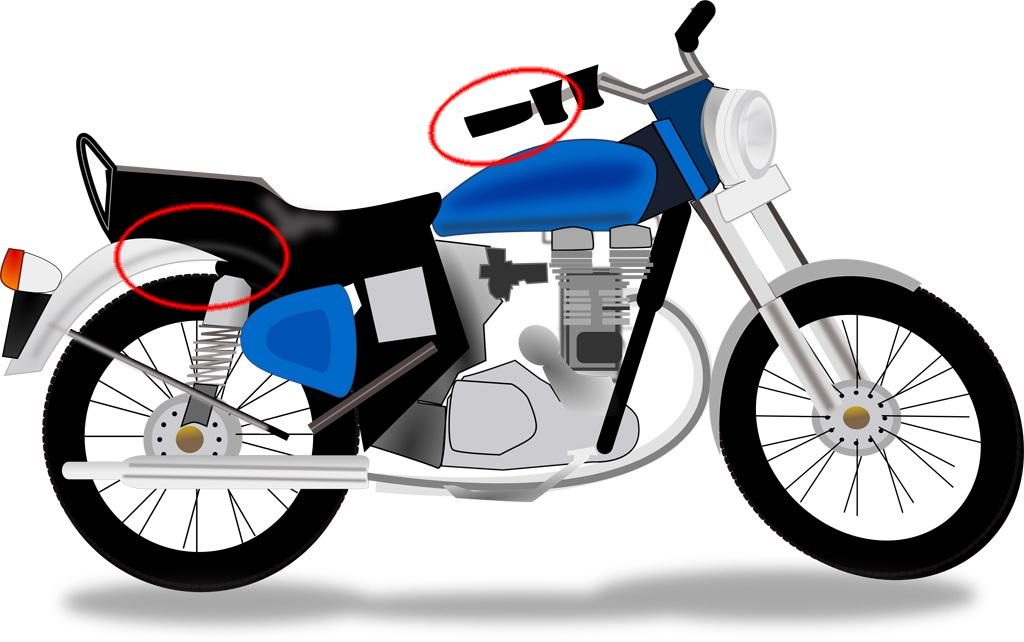
First, check the fuel cock before riding. If it is on, it is slightly behind the engine on the left side of the vehicle.

The illustration is oriented to the right, so it is often on the opposite (left side of the vehicle) side of the red circle.
The reason I wrote "if it's on" is because some vehicles don't even have a fuel cock in the first place. Especially, I feel like many modern bikes don't have one.
If your vehicle has a fuel cock, make sure it is properly turned on. If it is OFF, no gasoline will come out of the tank and the engine will not start.
Even if it did, it would quickly run out of gas and shut down because it is running on a very small amount of gasoline that has accumulated in the fuel tube from the cock to the engine.
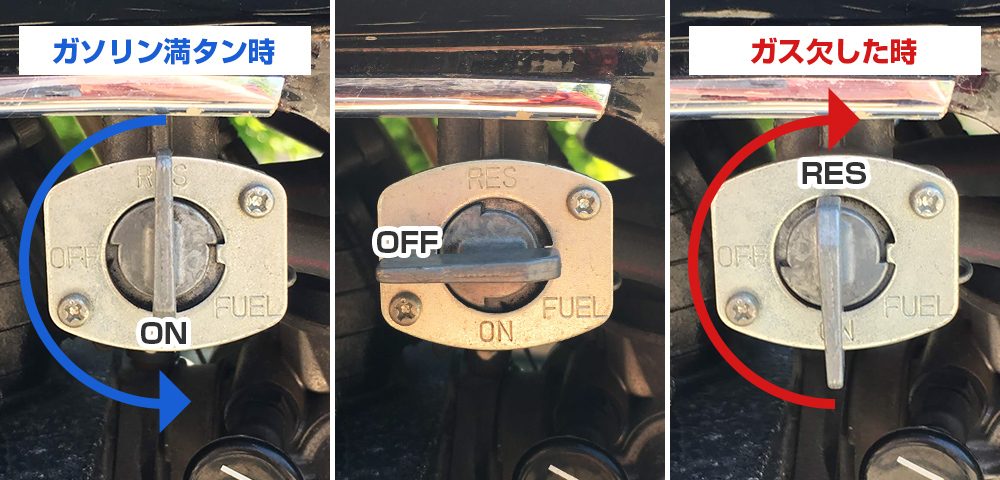
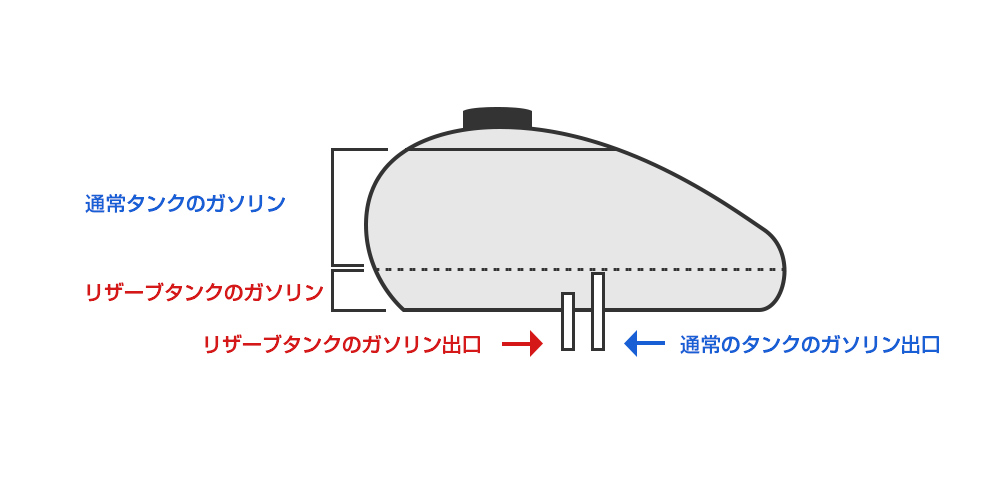
RES stands for reserve and is a reserve tank. Use this when you run out of gas while driving with ON.
If your bike doesn't have a fuel gauge and you run out of gas because you keep it on RES without realizing it, you'll have no choice but to walk to the nearest refueling station, pushing your heavy vehicle... so be sure to check. Don't forget. It's even worse when going uphill.
By the way, even though it is called a reserve tank, the fuel is actually taken from a different location, so don't worry that the gasoline in the reserve tank will not spoil even if you repeatedly refuel before you run out of gas and leave it on for a long time.
 Like this.
In addition, vehicles that use a negative pressure tank have ON/PRI/RES instead of ON/OFF/RES, but they are also turned ON when driving. (I will omit what PRI is as it is off topic)
Next, get on the bike, insert the key and turn it on.
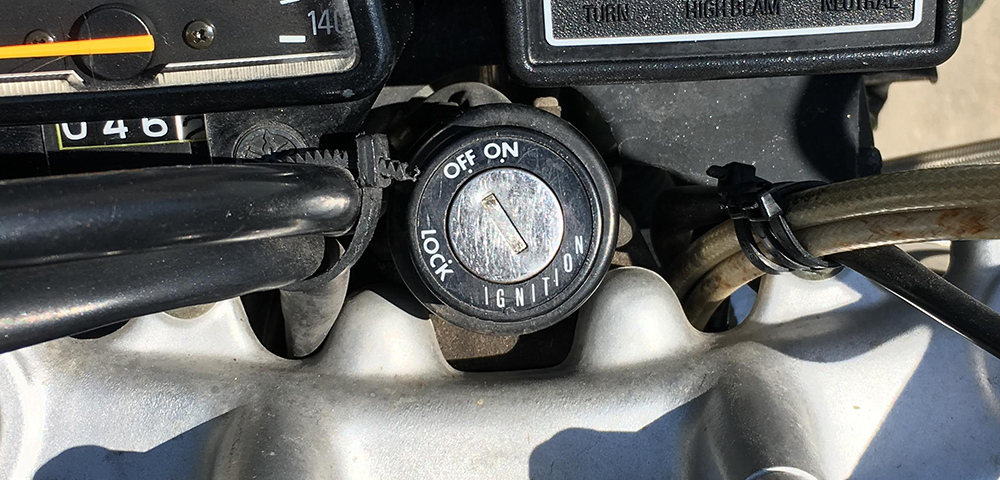
LOCK is used to lock the handle.
By the way, in most cases the keyhole is around the handlebar, but some vehicles have it on the engine side instead of the handlebar, and some vehicles have a card key instead of a regular key, so when you actually buy your bike, Please read the instruction manual carefully.
Even if I turn the key to turn it on, the engine still won't start.
Check the kill switch and if it is OFF, set it to RUN (picture of a rotating arrow).

This big red switch is the kill switch.
Used to forcefully stop the engine in an emergency, such as when the engine cannot be stopped due to a malfunction.
Next, check that the gear is in neutral using the neutral light.
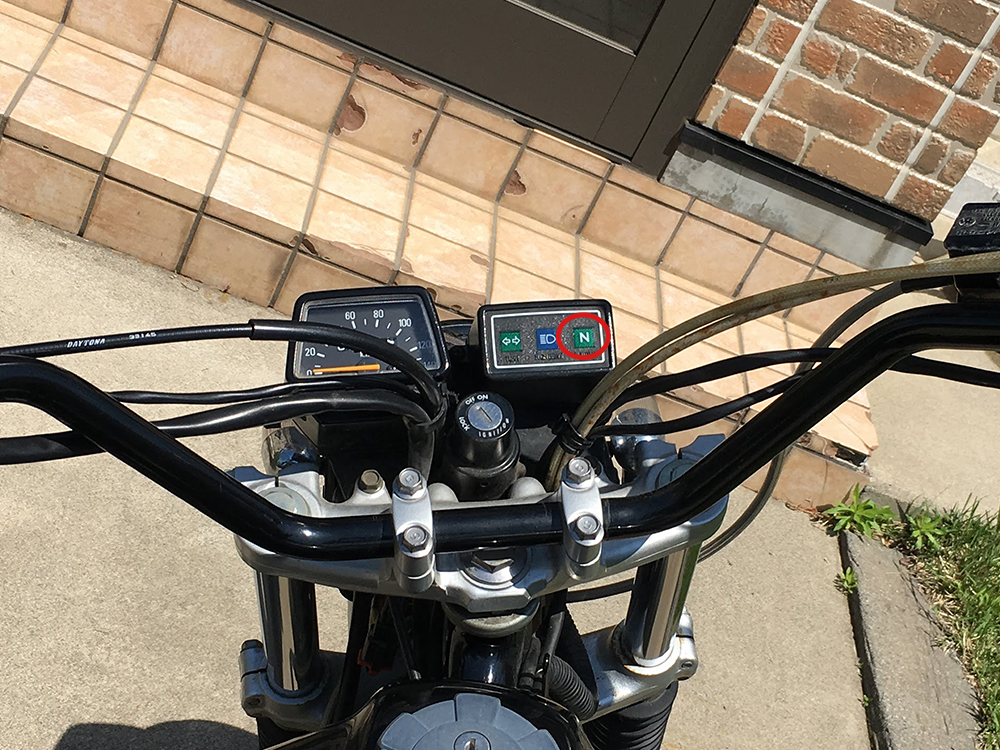
The location of the neutral lamp differs depending on the car model, but it is the green N-marked lamp around the meter.
As modern vehicles have become increasingly electronic, many cars will not rotate if the gear is not in neutral, the clutch is not engaged, or the stand is out.
However, in case of a malfunction, the car may suddenly shift into gear and start suddenly, so be sure to hold the clutch lever just in case.
At this point, you're finally ready to start. Finally, by pressing the starter switch on the right-hand handle, the starter motor (motor for starting the engine) starts, and the engine finally starts.
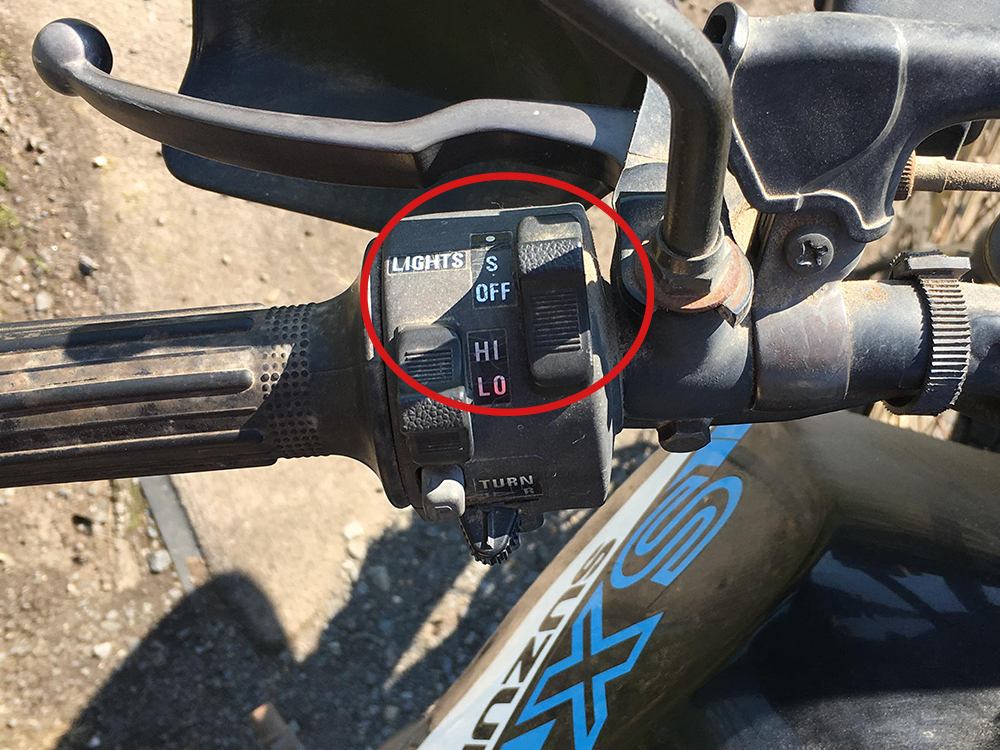
In addition, on older bikes, in addition to the kill switch and starter switch, there is also a light ON/OFF switch around here. (Modern motorcycles are required to have their lights on at all times, even during the day, so unless the bike is very old, there is no on/off switch for the light.)
In addition, in the case of a kick start type, pull out the kick pedal instead of the switch and kick it with your foot to start the engine. There is a trick to this as well, but I don't think there are any kick-start type cars available for training, so I will omit it this time.
If the engine is cold and difficult to start, such as in the winter, pull the choke lever and then turn the cell.
In addition, recently there are many vehicles that do not have a choke lever that can be adjusted manually because the choke works automatically called auto choke.
If there is a choke lever, this is the position.
By pulling the choke lever, the fuel ratio of the mixture (gas mixture of gasoline and air) is enriched. Generally speaking, the ideal (easily flammable) mixture is said to have a ratio of 1 part fuel to 14.7 parts air, but when starting a cold engine, it is about 1 part fuel to 5 parts air. It is said that it is better to increase the fuel ratio to the ratio of .
In addition, in winter, the humidity is low, so there are fewer water molecules in the air, and even if the same volume of air is taken in, the proportion of oxygen in the air is higher, so the air-fuel mixture tends to be leaner than in summer. is.
For this reason, when the engine starts poorly in the winter, using a choke will make the engine start better.
You might think, "Isn't it the same when you turn the accelerator?", but that's not the case at all.
Turning the accelerator increases the amount of gasoline, but it also increases the amount of air taken in.
Even if the mixture goes from 1:14.7 to 2:29.4, the fuel ratio will not change, right? It is important to enrich the fuel ratio.
However, driving in a rich condition is bad for the engine, so don't forget to turn the choke back on once the engine has warmed up to a certain extent.
Now, all you have to do is put the gear into gear and connect the clutch and you're ready to start driving!
Make sure it's safe, turn on your turn signal, head out onto the course, and then run around the outer course.
Super important! Never try to turn with the steering wheel!
Never try to turn using the steering wheel during normal driving, except in exceptional cases such as making a U-turn while keeping one foot on the ground.
A motorcycle is a vehicle that bends by shifting its weight. This is a very important part that is common to almost all curves, so I will write it down carefully even though it is a bit tedious.
Especially if you have a habit of bending the handlebars on your bicycle, be careful!
This is because the weight and speed of motorcycles and bicycles are significantly different, so the reaction of the vehicle to steering wheel operations is significantly different.
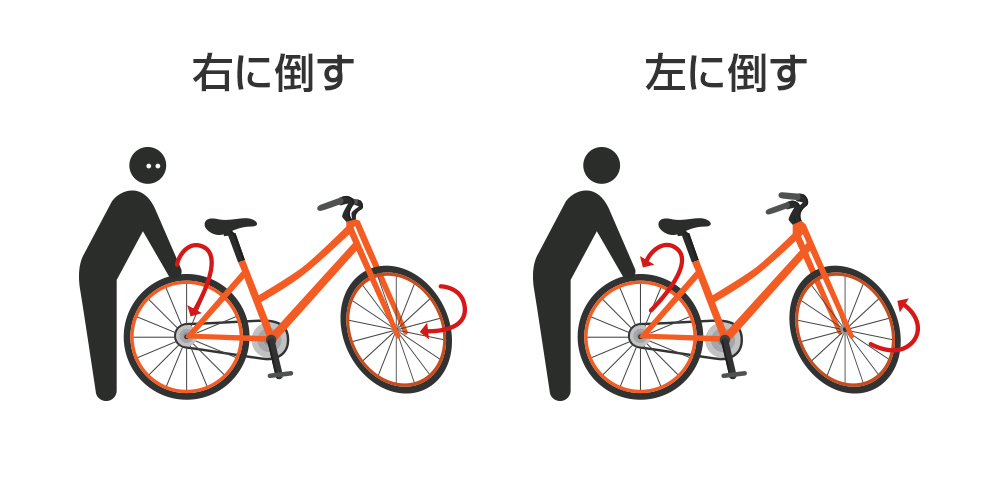
On a typical bicycle, if you turn the steering wheel to the left, it will turn to the left depending on the operation, right? So what would happen if you did the same thing on a motorcycle?
The answer is "turn right."
Hey, this author made a fatal typo in an important scene.
If you think so, wait. It's not a typo.
While riding a bike, simply turning the handlebar to the left will cause the bike to turn to the right. I will write more details step by step.
STEP 1 “Turn the steering wheel to the left”
↓
STEP 2 “The front wheels try to move to the left”
↓
STEP 3: “As a result, the vehicle leans to the right.”
↓
STEP 4 “Turn right”
This is the step. As a supplement, the steering wheel naturally turns to the right at STEP 4 to avoid falling.
*At this time, if you continue to forcefully turn the steering wheel to the left against the movement of the vehicle, the vehicle will tip over to the right.
I understand the logic, but in such a short time? You might think so, but if you were to travel at 30km/h, it would travel about 83cm in just 0.1 seconds. The total length of the bike is approximately 160cm, which is about half the length of the vehicle. In other words, if you turn the steering wheel and keep going,

The blue car body will come to the position of the red car body after 0.1 seconds. so? If you think so, try pushing your bike or bicycle forward with the steering wheel turned.
I actually tried it, and it bends like this.
During this time, even though the tires are trying to move to the left, the car body tries to continue moving straight due to inertia.
This is an object weighing approximately 250 kg (vehicle weight + rider's weight) traveling at a speed of 30 km/h. In addition, since it is trying to bend, centrifugal force is also generated in the opposite direction to the direction of bending.
However, the only part of the tire that is in contact with the road tries to go in a different direction against that force.
In other words, in this state, only the top part far from the tire installation surface is pulled in the direction shown in the illustration. As a rider, it feels like you are being pulled to the right.
If you have written this far, I think you can understand how strong the force is at work that causes it to tilt to the right.
If this happens, the only way to avoid falling is to turn to the right.
If this were a bicycle, you could turn to the left by "immediately putting your weight on the left side." In reality, even people who use the handlebars to turn their bicycles are actually unconsciously trying to balance themselves.
However, this is possible with a bicycle because the bicycle is considerably lighter than the rider's weight.
As I mentioned earlier, the weight of the motorcycle alone is nearly 200 kg. In order to turn the steering wheel and counter the inertia and centrifugal force, the rider must weigh nearly 200 kg.
Let's turn with self-steering
However, you won't be able to turn unless you turn the steering wheel! You might think so.
It's okay, the handle will bend on its own as long as you can shift your weight properly without using your arm strength. If you have a bicycle, try this experiment.
With the bicycle upright and the handlebars straight, try tilting the bicycle from side to side while pushing it forward. Then
 I think the handle will turn naturally like this. This is called "self-steering," and you should use it on your bike to turn.
summary
What did you think? At the driving school, we will do everything from the trigger I mentioned this time to starting running and circling around the outside in the first 1st to 2nd period.
There are two 50 minute classes, so the actual training time is 1 hour and 40 minutes.
When I write this down again, I realize how efficiently driving schools teach a variety of knowledge and skills in a short amount of time. Of course, during the actual training, they will give you various advice other than what I have written this time.
I hope this article has alleviated some of your concerns about attending a driving school.